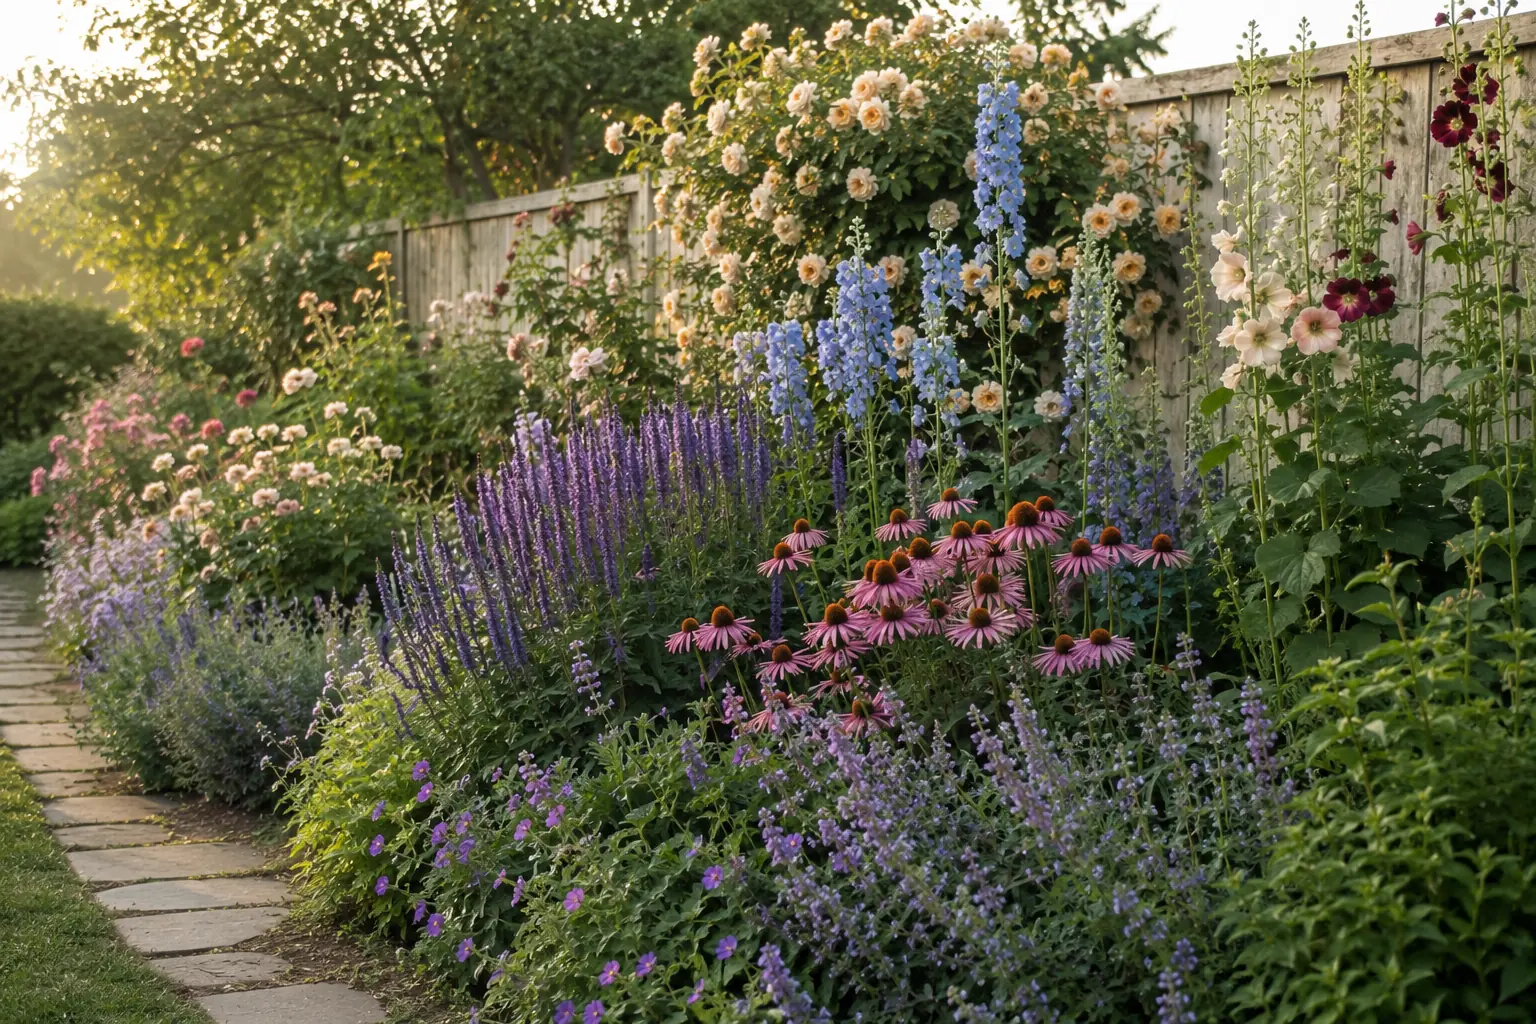
A cottage garden border should feel generous, romantic and slightly spontaneous—but the easiest borders are built on a quiet structure. Once you decide which plants will form the back, middle and front layers, the flowers can mingle without the whole bed feeling accidental.
The quick answer: use three layers and repeat them
| Layer | Main job | Typical position | Check before planting |
|---|---|---|---|
| Back or anchor layer | Height, structure and focal points | Along the rear of a one-sided border; nearer the center of an island bed | Mature height and spread, wind exposure, support |
| Middle or mass layer | Most of the color and repeated groups | Around and in front of anchors | Bloom season, foliage after flowering, spacing |
| Front or edge layer | Softens paths, lawn and bare soil | At the viewing edge and between larger plants | Mature spread, flopping habit, foot traffic |
Begin with the back layer, add repeated middle groups, then finish the edge. Weave bulbs and short-lived annuals through all three layers for seasonal color, but keep the permanent structure easy to read.
This guide turns that structure into a beginner-friendly plan. If you are still deciding where beds, paths and focal points belong, begin with our cottage garden layout for beginners. Then return here to arrange one border from the soil line upward.
You do not need a huge plant list or a perfectly measured drawing. You need a clear view of the site, a few repeated plants, several seasons of interest and enough space for every choice to reach its mature size. The result can look soft and abundant while remaining practical to water, weed and edit.
SITE AND CLIMATE NOTE / Plant performance varies with climate, light, soil, drainage and cultivar. Use plant labels and local horticultural or extension guidance to confirm mature size, hardiness, planting time and water needs before buying.
What makes a cottage garden border work?
A border is a planted bed usually viewed mainly from one side, often along a fence, wall, path or property line. An island bed is viewed from several sides, so its tallest structure usually sits nearer the center. The same layering principles work in both places; only the viewing direction changes.
Cottage style comes from close visual relationships: flower spires rising through rounded foliage, low plants softening an edge, and recurring colors linking one part of the bed to another. The design should not be a staircase of perfectly separated heights. A few airy, see-through plants can drift forward, and a low plant can repeat deeper in the bed. The layers are a guide, not a wall. For help choosing those recurring shades, see our guide to cottage garden color schemes.

Plan your first border: Get our free Cottage Garden Seasonal Planner by email when you subscribe. Use the garden notes to record your border measurements, the planting wishlist to shortlist plants for each layer, and the project planner to choose your next task.
Before choosing plants, read the site
1. Measure the bed and mark the main view
Record the border’s length and depth, then note whether it is seen from a path, a patio, a window or several directions. Mark gates, downspouts, utility covers and any place you must reach. A quick sketch to scale helps you estimate plant numbers and prevents a mature shrub or rose from swallowing the walkway.
2. Observe light instead of guessing
Watch the site across a normal day during the growing season. A fence, tree or building can turn one end of the same border into a different planting condition. Group plants by the light they actually receive rather than forcing one palette along the entire length.
3. Check soil, drainage and water access
After rain or irrigation, note where water drains quickly and where it lingers. Identify very dry sections, compacted areas and places reached by roof runoff. Improve the soil appropriately before planting, remove perennial weeds and plan how you will water new plants while their roots establish. Where compacted or unreliable ground makes preparation difficult, compare our best raised garden beds for flowers and cottage gardens.
4. Build a short plant brief
For every candidate, record light, moisture, mature height and spread, hardiness and season of interest. Our best cottage garden plants for beginners can help create a shortlist, but the final choices must fit your exact site.
The simple three-layer cottage border
Back layer: anchors, spires and vertical structure
The back layer gives the border a silhouette. Use a limited number of strong plants rather than a different tall flower every few feet. Depending on climate and space, this layer might include a shrub rose, compact flowering shrub, hollyhocks, foxgloves, delphiniums, tall garden phlox, ornamental grasses or a clematis on a support.
Place dense, substantial plants toward the back of a one-sided border. Tall plants with narrow stems or an open canopy can occasionally move forward to make the planting feel more natural. Repeat one anchor or one vertical flower at intervals so the eye recognizes a pattern. Check which plants need staking or shelter before they lean over smaller neighbors.
To bring height into a layered border, see our guide to garden trellises for climbing plants and choose a support that suits the climber’s mature weight.
Middle layer: repeated color and dependable body
The middle layer carries most of the display. Choose several reliable perennials with useful foliage, then arrange them in groups rather than as isolated single specimens. Peonies, salvias, coneflowers, catmint, hardy geraniums, yarrow and medium-height phlox are examples, but suitability depends on the site. See our guide to the best perennials for a beautiful cottage garden for more ideas.
Repeat two or three middle-layer plants in separate parts of the border. Repetition creates rhythm, while small changes in the companion plants keep the result informal. Include more than flowers: rounded leaves, fine grasses and upright foliage hold the composition together before and after bloom.
Front layer: soft edges and low weaving plants
The front layer should make the border feel connected to the path or lawn. Low-growing hardy geraniums, dianthus, catmint, compact lavender where drainage suits it, sweet alyssum and other spreading plants can cover the soil and soften a hard line. Avoid placing vigorous spreaders beside paving unless you are willing to trim them.
If the border runs beside a walkway, coordinate its surface, edging and planting with our updated cottage garden path ideas guide.
Leave small openings where stepping access is useful, especially in a deep border. A border that looks full from the main view can still contain discreet gaps for maintenance.
For planting, weeding and dividing plants within those access points, our guide to comfortable garden kneelers and seats compares cushioned pads, folding seats and supportive side-rail designs.

Seven steps to design the border
1. Draw the shape and reserve access
Use a hose for a curved edge or a string line for a straight one. Look at the shape from the main viewing points before cutting or planting. On the sketch, reserve access to taps, fences and the back of deep sections. If the bed is too narrow for three full rows, use compact plants and gain height with a trellis or obelisk.
2. Place the permanent anchors first
Position roses, shrubs, climbers, grasses or long-lived structural perennials before adding seasonal fillers. These plants define the border in early spring, late fall and winter, when many flowers are absent. Give them their mature footprint on the plan—not the size of the nursery pot.
3. Choose a restrained repeat palette
Select a few dependable plants that can reappear along the bed. Groups of the same species or cultivar are easier to read than a collection of unrelated single plants. Odd-numbered groups often feel natural, but mature spread and available space matter more than a rigid number. Repeat a color or leaf shape when the same plant cannot grow in every part of the border.
4. Plan a sequence, not one peak week
List what will carry the border in spring, early summer, late summer and fall. Weave spring bulbs for a cottage garden between perennials so they flower before the middle layer reaches full size. Later, use annuals to bridge temporary gaps rather than overcrowding the permanent plants. When fall planting begins, our guide can help you choose the right bulb planter for your soil and planting scale.
5. Mix form and texture
Combine flower shapes as well as colors: spires, daisies, rounded heads and airy sprays. Balance fine foliage with broader leaves and pair upright plants with softer mounds. This variety keeps a limited palette interesting and gives the border character even when only a few flowers are open.
6. Set out plants before digging
Place the plants in their pots across the prepared bed. Step back to the path, patio and window, then move the pots until the repeats and heights feel balanced. Read each label and space for mature spread. Filling every gap on planting day usually creates crowding later; use mulch and temporary annuals while perennials establish.
7. Add supports, labels and a watering plan
Install supports while plants are small so stems can grow through them naturally. Label important cultivars and photograph the finished layout. Keep the essential garden tools for beginners nearby, and water according to plant needs and local conditions while roots establish.
If you plan to irrigate at soil level, our step-by-step soaker hose guide explains layout, pressure and timing for densely planted borders. To automate those watering sessions, compare our best hose timers for garden watering.
A sample sunny cottage border palette
This sample is a design framework, not a universal shopping list. Choose locally suitable cultivars and confirm their mature size, hardiness and water needs. Keep two or three colors consistent across the layers—for example, cream, soft pink and violet with touches of green.
| Layer | Possible plants | Design job | Selection note |
|---|---|---|---|
| Back / anchors | Shrub rose; delphinium; hollyhock; clematis on support | Scent, spires and vertical structure | Check support, wind exposure and mature size |
| Middle / masses | Peony; salvia; coneflower; garden phlox | Repeated color and dependable body | Choose a sequence of bloom times and useful foliage |
| Front / edges | Catmint; hardy geranium; dianthus; sweet alyssum | Soft path edge and ground-level continuity | Match spread to the path and local climate |
| Seasonal weaving | Daffodils; alliums; tulips where suitable; cosmos; calendula | Fills seasonal gaps without replacing structure | Use bulbs and annuals in pockets, not everywhere |
SAFETY NOTE / All parts of foxglove are highly toxic. If you include foxgloves instead of delphiniums or hollyhocks, keep them away from children and pets who may sample plants, wear gloves when handling them, and never treat them as edible flowers.
How to adapt the plan to a small or narrow border
A small border needs fewer varieties, not smaller ambition. Choose one vertical element, two repeated middle plants and one low edging plant. Use a climber to add height without consuming much ground, and repeat color through bulbs or annuals. Our small cottage garden ideas offers additional ways to make limited space feel layered.

Avoid miniaturizing a deep-border plan by squeezing every plant closer together. Select compact cultivars from the start and keep one clear maintenance route. A restrained plant list will usually make the space feel larger and more intentional.
Common cottage border mistakes
- Buying only for flower color: Height, spread, foliage, bloom season and site needs determine whether the combination will work.
- Using one of everything: A row of unrelated single plants can feel restless. Repeat dependable choices in groups.
- Planting for pot size: Nursery plants look small. Space according to mature spread and accept temporary gaps.
- Making a rigid staircase: Let a few airy spires drift forward and allow low plants to weave inward.
- Planning only for summer: Add spring bulbs, late-season flowers and structure that lasts beyond bloom.
- Blocking access: Reserve stepping points and reach paths before the border fills in.
- Ignoring support and wind: Install discreet supports early and place tall plants where they will not collapse over the path.
- Keeping every self-seedling: Retain volunteers that strengthen the pattern and remove those that crowd paths or valuable perennials.
Care after planting
Water new plants according to their needs and weather until they establish, checking the soil rather than relying on a fixed calendar. Add an appropriate organic mulch to conserve moisture and suppress weeds, but keep plant crowns and woody stems clear. Recheck ties and supports as growth increases.
During the season, deadhead plants where it encourages more flowers, leave selected seed heads for structure or wildlife, and edit unwanted seedlings early. Photograph the border at least once each season. Use the fall cottage garden checklist to review overcrowding, gaps, supports and bulb opportunities before next year.
Final thoughts
A successful cottage garden border is not a dense collection of every plant you love. It is a repeated three-layer pattern that leaves room for those plants to mature. Begin with the anchors, build a dependable middle, soften the edge and weave seasonal color through the framework.
Start with one manageable section and improve it through observation. When a gap appears, fill it deliberately with a perennial, bulb or one of our cottage garden flowers from seed. The border will become fuller and more personal over time without losing its structure.
Frequently asked questions
How wide should a cottage garden border be?
There is no single ideal width. Aim for enough depth to hold the mature spread of a low, medium and tall choice without forcing them into one crowded row. In a narrow strip, use fewer compact plants and gain height with a climber or support.
How many different plants should I use?
Use fewer types than you first think you need. One or two anchors, several repeated middle plants, one or two edging plants and seasonal bulbs or annuals can create plenty of variety. Increase the list only when a new plant fills a missing season, texture or site condition.
What should I plant at the front of a cottage border?
Choose low plants that suit the light and soil, have a manageable spread and look good from close range. Hardy geraniums, dianthus, catmint, compact lavender in free-draining sun, sweet alyssum and low bulbs are possible examples. Confirm local suitability before planting.
Should the tallest plants always go at the back?
Dense, substantial plants usually belong toward the back of a one-sided border. Tall, slender or see-through flowers can move forward occasionally to create a relaxed, layered look. In an island bed, place the main height nearer the center and grade outward.
How long will a new border take to fill in?
It depends on plant type, starting size, climate and care. Annuals can add color in the first season, while many perennials and shrubs need more time to reach their mature presence. Do not crowd plants to force an instant result; use mulch and temporary annuals while the permanent structure develops.
Leave a Reply